Share
Pin
Tweet
Send
Share
Send
The basic principle of this compound is the rigidity of the fit of the elements in such a way as to counteract their pulling and breaking. Due to this, for example, permissible loads on the prefabricated element of the roof are calculated. The accuracy of the connection ensures its integrity and durability, even in the absence of additional fastening elements - glues, pins, nails or self-tapping screws. The Japanese even have such an art - "Kigoroshi", the meaning of which is to make the connection (not only cross) as accurate and accurate as possible.
Instruments
- Hacksaw;
- Joiner's square;
- Several chisels of different widths;
- Hammer with a metal brisk.
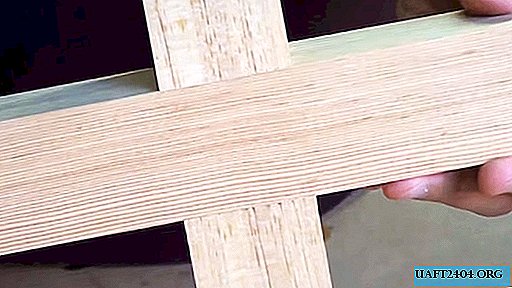
How to make a transverse joint in half a tree
Suppose we need to make a cross for a Christmas tree, mannequin, or for some kind of interior item. For this we take two wooden blocks with a section of 4-5 cm. We cut them along a length of about 30-50 cm. For such products, non-solid wood species, for example, pine, poplar or alder, which are most easily processed, are suitable.


We find the middle of the first bar, and mark the dimensions of the width of the second from it. To mark the transverse lines, we use a joiner square with a bounding edge.

With a hacksaw, at the edges of the marking, we make cuts to the middle of the thickness of the bar. We add a few more cuts for easier operation of the array. The same thing needs to be done on the second bar, only in mirror image.


Here, chisels of various widths are used as cutting tools. The narrower one can cut off the main part, making a rough cleaning of the surface. And here, with a wider chisel, clean the cut plane cleanly. For cutting it is convenient to use a mallet with a rubber or wooden striker.


It is not worth triggering the entire thickness of the array at once. Start slicing first on one side and then on the opposite. This way you will avoid unforeseen chips and cracking that will ruin the look and integrity of the connection.


Upon completion of work with chisels, a square or a ruler, check the evenness of the planes and side faces of the joint on both bars, and, if necessary, pick up burrs from the edges of the workpieces.


And now the time has come to the most important nuance of Kigoroshi technology. The remaining uncut parts of the bars at the junction of the cross must be lightly crushed with a hammer with a metal hammer. The essence of the method is to slightly crush the wood, but not to allow it to crack. This must be done on both sides of our bars.


We plant the bars at the place of their connection, tightly pressing with your hand. If the eye is not loose, it will be rather difficult to do it manually. With the same hammer, we gently nail down the junction from above through a wooden gasket-board.


Tightly placed cross-on-cross bars are firmly and reliably held without glue or pins. Yes, and such a connection looks very aesthetically pleasing and neat. By the way, the Japanese advise, before directly fastening the cross, to wet the edges of the bar pressed with a hammer with water. Moisture will cause the wood fibers to swell and return to their original position, which means to make the connection even denser and stronger. And after drying the crosspiece can be disassembled and reused if necessary.


Practical advice
Work with chisels in the manufacture of such tenon joints implies their exceptional sharpening. Otherwise, chips and cracks cannot be avoided. You can sharpen them on a felt circle or on a leather belt greased with Goya paste, bringing their blades to the edge of the razor.
Share
Pin
Tweet
Send
Share
Send