Share
Pin
Tweet
Send
Share
Send
Flinty - a pretty interesting thing. In stores specializing in this kind of goods, of which only shapes, sizes and types they are not. Do not list everything. I acquire flint quite often, as it is indispensable and very practical in the forest. It leaves me pretty quickly - I basically don’t use matches or lighters in the forest, even though they are in my bag, as NZ. As a great connoisseur, and a frequent user of this thing, I could not pass by when I saw a flint, which I did not have yet - a flint with a magnesium bar.

I noticed it in the online store, and immediately ordered it. But the order never reached me. Both for the first and second time! This happens, unfortunately. Fortunately, at least the funds were returned ... Leaving further attempts to order again, I decided to make the thing I needed on my own - I had everything I needed.
You will need:
- Magnesium bar is not shorter than 6 mm (cylindrical, or parallelepiped - at your discretion; which will be more convenient for you to use).
- Ferrocerium rod (6 × 60 mm).
- Glue second.
- Drill with a 6 mm drill.
- Punch.
- Bor machine with cutters and a cutting disc.
- Ruler with marker.
- Pliers.

Flint assembly of two metals
Let's start by marking the magnesium bar for drilling.


We will need a lot to drill and cut! Although here, probably, it all depends on the diameter and length of the ferro-cerium rod. At one time, I acquired quite a few rods with parameters of 6 × 60mm. And now I constantly use them in the assembly of the next flint. There are all sorts of sizes. Starting from 4 × 40 mm, and ending with 15 × 150 mm, different combinations. But the most optimal, in my opinion, is 6 × 60 mm. So, we need to cut a groove in the magnesium bar. 60 long, 6 wide, and 3 mm deep. For those who do not have special equipment (like me, for example), for such a purpose there is a well-known way of drilling. Fortunately, magnesium with a purity of 99% is very soft and supple, so it will not require any titanic efforts to make the plan. After marking, apply the punch marks on the entire length of the markings, in increments of 4-5 mm. Like this:


Next, you will need a 6 mm drill, which we will install in an electric drill, and begin to drill the recesses according to the marking marks, 3 mm deep.


Now we need a bor machine, with a set of small cutters and a cutting disc for them, to align the walls inside the groove.

First, we align the notches remaining after drilling with a cutting disc along the entire length of the groove. Then, with the help of mills, we bring the walls to a more or less even state. So that the ferrocerium rod could lie in the groove.

By the way: the remaining magnesium shavings and sawdust after work can be collected - this is a great kindling.

Magnesium shavings are excellently ignited by sparks of a ferro-cerium rod, and burn very hot. Actually, from this heat the other kindling is ignited. At the end of the workshop you can see how the magnesium shavings burn ... Next, you need to glue the ferro-cerium rod into the groove. And so that he holds on there more firmly, we will make notches on the rod. Along the entire length.


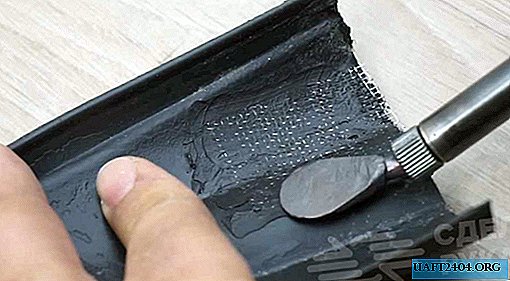
Now everything is simple: drip glue into the groove and put the rod there. Notched down.


If there are gaps at the edges of the rod, just fill them with glue and pour a little soda there. The glue will petrify very soon, and the rod from the groove is no longer available. Is that a hammer and a chisel! The main work is over. It should look like this:

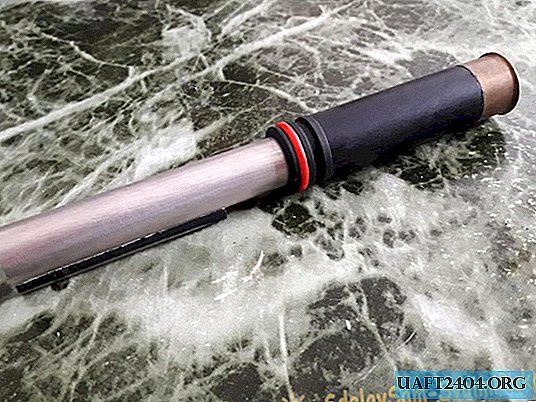
Well, and for added convenience, you can make a simple handle. For this purpose, I took the first tube that came up, suitable in diameter, greased the inside with glue, and put it on a magnesium bar. Well, he made the top from the bottom of the spent sleeve.

Here, in general, everyone can improvise to the best of their imagination. Thus, we got a flint, and kindling for it, in one product.

This is very convenient for novice users, rather than carrying everything separately, or looking for kindling in a damp or cold forest. Even a person who has never held this tool in his hands will be able to get fire with such a flint! You just need to scrape off the chip from the soft magnesium bar with a knife, and immediately cut a spark on this chip. In the video you can see how birch bark flashes from the heat. Take along such a flint for fishing, relaxing, or camping, and you will never be left without fire. As for me, in every trip I always have two flints with me - one hangs on my belt, the second (NZ) lies in my bag.
Share
Pin
Tweet
Send
Share
Send