Share
Pin
Tweet
Send
Share
Send
Will need
Materials for decor mugs with volumetric Moomin:
- Polymer clay (white and brown).
- Solid mug.
- Auxiliary tools (stationery knife, stacks, toothpick).
- Black acrylic paint.
- Glue.
- Alcohol and cotton pad.

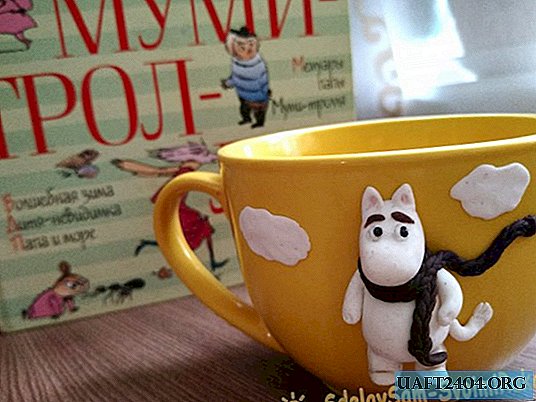
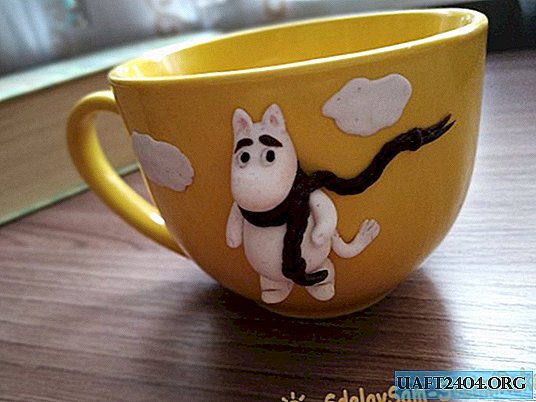
Decor mugs with polymer clay. Master class "Moomin in a scarf"
Step 1. Clean the base mug
Take a ceramic mug and thoroughly wipe it with a cotton pad moistened with alcohol. On a clean, fat-free surface, the plastic will not get dirty.

Step 2. Form the Moomin Body
Cut a small piece of polymer clay of white color with a clerical knife. Mash thoroughly in your hands. Form an oblong "sausage" and a small ball.

Take an elongated piece of plastic and push a small indentation in its upper part. This can be done with the rolling movements of the index finger.

Now bend the bar of white plastic. The fold point will be the thinnest section.

We got the head and body of the Moomin troll.
The resulting figure is too voluminous to fit on a mug. Therefore, it is necessary to reduce its thickness. To do this, cut a Moomin figure in half with a clerical knife.

Try our character's body on a mug.
Advice! Fasten all elements of the product to the mug. This will help ensure that the back of the figure fits perfectly to the mug.

Step 3. Fashion the paws, tail and ears
Tear off a small piece from the prepared ball of white plastic. Form an oval.

Using a stack or knife, divide the oval in half and form the hind legs of the Moomin. This can be done with simple rolling movements or modeling tools.
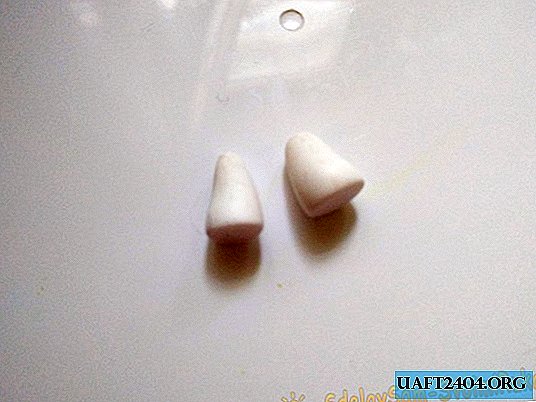
In the same way, fashion a second pair of paws.
Try all the paws on the body of the Moomin troll on the mug.
Tear off a few very small pieces of white clay and form two triangular ears and a long tail.

The tip of the tail can be made embossed with a toothpick or needle.
Fasten all parts to a mug and smooth out irregularities with your fingers or tools.

Step 4. Add a Knitted Scarf
Cut a small piece of brown polymer clay. Mash it thoroughly.

Cut into 4 equal parts. Roll them on the surface with your index finger to the thinnest "strings".

Twist one pair of “threads” from clay with a tow from yourself, and another pair with a tow for yourself. This way of twisting will give the effect of a knitted scarf.

Combine the two harnesses obtained.

Divide into two unequal parts and place the scarf on the Moomin figure.
Step 5. Complete the image
From the remains of brown clay, form tiny eyebrows and transfer them to the figure. And from the remnants of white - flat ovals for the eyes. To further decorate the mug, you can sculpt several clouds.

Advice! Try the legs, scarf and ponytail in different positions. You may find a more interesting pose for your figure.
At this point, smooth all the seams between the elements and fix what you don't like. Add relief to the paws, ears, and tips of the scarf with a toothpick.
Step 6. Bake the figure
Send Moomin directly on the mug to bake in the oven. The optimal time and temperature for baking are indicated on the packaging of your plastic.
After cooling the mug, it remains only to draw the Moomin pupils with black acrylic paint.

Advice! Use a toothpick to apply paint if you do not have a sufficiently thin brush.
For reliable fixation, carefully separate the figure from the mug and glue it in the same place.
Mug with polymer clay Moomin is ready!


Share
Pin
Tweet
Send
Share
Send