Share
Pin
Tweet
Send
Share
Send
One of the main parameters of a twist drill is the apex angle, which for hard metals (steel, cast iron, solid bronze, titanium, etc.) is approximately 120 degrees.
Deviation of this angle to a greater or lesser side from the nominal value complicates the effective operation of the drill. In the first case, productivity drops and the tool overheats, in the second case, the drill can simply break, unable to withstand excessive loads.
To comply with the sharpening parameters without special tools, it is necessary to have high qualifications and experience of the tool-sharpener. Well, to a layman, especially in everyday conditions, it will be practically impossible to do this.
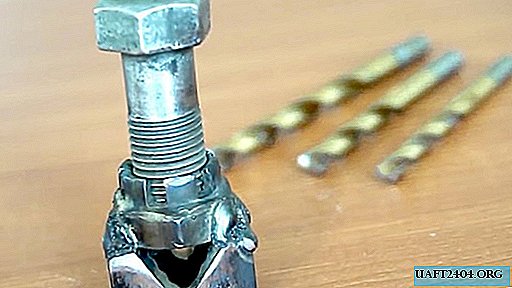
But, having some tools and simple materials, it is possible to make a not very complicated, but reliable device for sharpening the angle at the top of a spiral drill over hard metal.
What you may need to work on the device
This will require the following tools:
- calipers;
- marker;
- vise for metal;
- Bulgarian;
- pliers;
- welding machine;
- grinding machine with an emery wheel.
Of the materials for work, you must have at hand:
- regular hex nut;
- castellated nut;
- a bolt of the same size and thread as the nuts;
- sharpening twist drill.

Manufacturing process
A feature of the hex nut is that any two of its adjacent faces converge at an angle of 120 degrees. About the same size is the angle at the apex of the twist drill for working on hard metals. This random coincidence can be used to make a tool for sharpening a twist drill.

To do this, using a caliper and a marker on the nut, we outline the cut lines so that a triangular cut is obtained, symmetrical with respect to the diagonal connecting the two opposite corners of the nut. A drill will be placed longitudinally in it before the sharpening process.


To cut out the intended triangular groove in the nut, it is clamped in a vice and the grinder cuts along pre-drawn lines. To remove the sawn off pieces of the nut, you can use pliers.


Next, a castellated nut is taken and welded to the first nut from the side of the cut groove with its base. Moreover, it is necessary to observe their absolute coaxiality, because when small-diameter drills are sharpened, the bolt, passing through the castellated nut, will begin to screw into the lower nut in order to firmly clamp the drill into its groove.


Now we screw the corresponding bolt into the castellated nut, which will securely press the drill, which is placed in the groove for grinding on the emery of the grinding machine.


It remains only to sharpen the drill on the emery wheel, using the edges of the lower nut as a template.

To do this, we just grind the protruding part of the drill flush with the edges of the nut, which even a student of a vocational school of the first year of study can easily cope with.


After sharpening, the bolt loosens, the drill is removed from the improvised device and can be used for its intended purpose.

Additions and improvements
In the process of welding nuts, liquid metal splashes may occur on the threads of the castellated and regular nuts. To exclude this trouble, it is necessary to screw a bolt into them and, thereby, protect the thread.
Since with the help of one device it will not be possible to cover all the drills in diameter, at least two template clamps will be required: one for small drills, the other for large products. Accordingly, in the first case, the nuts will be small in size, and in the second - large.
Share
Pin
Tweet
Send
Share
Send

