Share
Pin
Tweet
Send
Share
Send
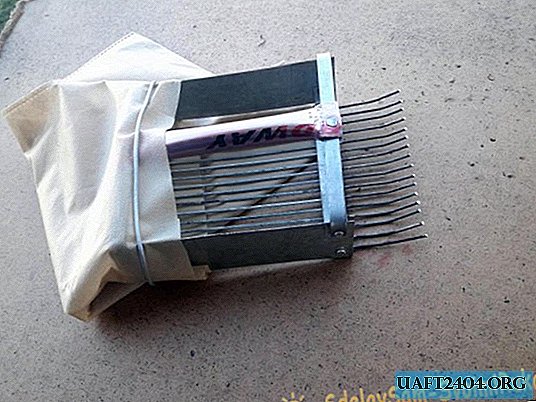
In late August, it is time to collect lingonberries. Both lovers of berries and pickers for sale will fall into the forests. In order not to linger in the taiga for longer than necessary and not to feed mosquitoes, a berry harvester will help you. To make such yourself, with your own hands, is not difficult. And again, there is some kind of savings - a similar combine harvester is not cheap in a store. In order not to rush around in search of the right thing, when it is needed, I propose to prepare it in advance. Let it lie - it is better to have and not need than to need and not have! It will take a little time to make this tool.
Will need
- Cink Steel.
- Marker.
- Flux and tin for soldering.
- Steel wire with a cross section of two millimeters (you can bicycle spokes).
- Five millimeter aluminum wire for rivets.
- Scissors for metal.
- Hammer.
- Thick fabric.
- Aluminum tube (from a ski pole).
Production of a harvester for picking berries
To begin with, we cut off two strips from galvanization: three by fifteen cm. We bend them in turn exactly in half, along the entire length. From each end, on one side, cut off two cm of one of the layers.

Further, on the folds of both strips, in increments of not more than five mm. make notches for knitting needles with an emery wheel.


Now cut two strips of five by eighteen cm. - these will be the end walls.

We drill at the ends of the bent blanks through the hole, then, applying them to the wide end strips, make marks with the marker and drill holes in the wide strips.

Now rivet the blanks.

We insert the knitting needles into the cut notches and, having pre-treated with a soldering flux and soldering the knitting needles first to one strip, then to another, so that they do not hang out later.


Soldering the whole thing turned out to be simple, I didn’t even need a soldering iron - I just heated this design with a torch and holding it with pliers, I just put solder to the soldering places: the tin itself flowed into all the cavities. Now let's start making the holder. It is necessary to cut two narrow, one cm. Strips, fifteen cm long. However, I was too lazy to cut, and put in place old skewers of suitable width.

You will also need a piece of aluminum tube, eighteen cm long.

Flatten the ends of the tube and make holes in them.

Next, take two narrow centimeter strips, and drill holes in them in turn, at the ends and in the middle. We bend the ends with the holes two cm to one side.

We rivet these curved strips to the ends of the tube. You get such a holder.


Now, with the help of a chisel and a hammer, we align the teeth-spokes one length - five cm. And drill holes in the upper four corners of the end walls. Now we lift, by bending inward, the end walls and rivet the holder to these holes. Here is what should happen.


Now we bend the knitting needles up and fasten, with a rope or wire, some kind of bag where the berries will roll. Instead of a bag, you can use a leg from old jeans, and adjust its length with the help of bending and fastening with pins.

Share
Pin
Tweet
Send
Share
Send