Share
Pin
Tweet
Send
Share
Send
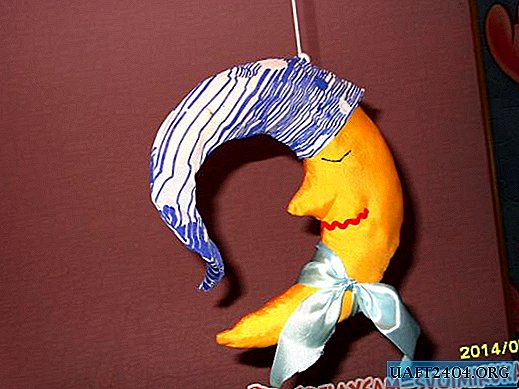
Such a moon can be sewn in an hour - two maximum, for its manufacture you need very few materials, the process is not particularly complicated and painstaking. This is a wonderful decor for a children's room or a pleasant friend with whom a child will sleep much more interesting.

For work you will need:
1. The fabric is yellow and blue (in our case, the moon has sides of different colors, therefore the material is yellow and orange);
2. Blue ribbon for decoration, red ribbon for the mouth, cord or ribbon for hanging;
3. Threads: white for stitching parts, black for embroidering eyes and red for mouth;
4. Paper and pen for drawing patterns;
5. Scissors, a needle, a button.
On paper or newspaper, draw the figure of the month. It is best to draw an even circle with a diameter of about 22-25 cm, and then turn it into such a profile of the moon.

You cut out the pattern, apply it to the matter and draw two identical parts along the contour - the left and right sides.

When you start cutting, consider the margin for seams - 0, 5 - 1 cm.

Fold the two sides of the pattern and sew with the most ordinary cushioning seam.

Do not finish slightly to leave a filling hole. Turn the part and tightly fill it with padding polyester.

Sew a hole. Around the top of next month, you need to sew on a ribbon or cord on which the toy will be hung, fasten it with a button so that it holds well.

With accurate stitches, embroider the month's eyes on both sides.

Cut a piece of braid and sew it on the place where you want to make the moon a smile.

The result is a pretty dormant month that smiles in a dream.

Something is missing? Need a hat cap, a pattern of which you draw on the newspaper. To do this, bend just above the nose and attach the previous one, which was done for a month, to guess the size, draw a long tip.

Transfer the resulting pattern to the fabric prepared for the hat.

Two parts are also needed - left and right. Cut them indented, connect with the same seam, do not forget to bend and hem the edge. Turn out the finished product using a pencil or pen for a thin tip.

You should get a cap with a long wrapped tip.

Put a hat on the moon, carefully stretching the sewn lace for suspension between the stitches of the seam.

Take an ordinary blue ribbon.

Decorate the month with its help, having imposed a bow or knot in the form of a neck scarf.

The toy is ready. It can be hung on a wall, cornice or chandelier in the children's room as a decor.

Or a child can play with her and go to bed. After all, who else but a magical month is able to give fairy tales to kids?

You can additionally make and hang stars from cardboard in the room, decorating them with a thick layer of cosmetic sparkles planted on PVA glue. Or sew them from the same yellow fabric as the moon. Such a space ensemble will become a truly fabulous decoration of the baby’s first room.
Share
Pin
Tweet
Send
Share
Send

