The peculiarity of this countertop for the dining table is that exactly the same you will never meet anywhere else. First of all, we prepare the materials for the countertop - first we select the appropriate boards, then we cut them to size, grind them, and then glue them together.

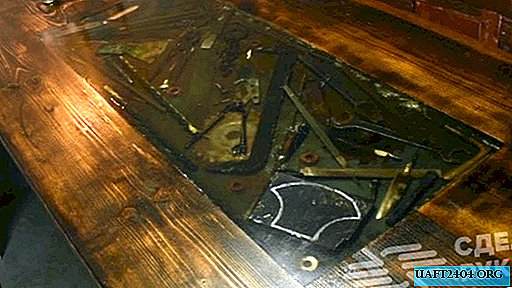
When the wooden base of the countertop is ready, it is necessary to cut a rectangular “window” in the middle. It is on this part of the dining table that the main emphasis will be placed.
The main stages of work
We fasten a steel sheet of suitable sizes to the inside of the countertop so that it overlaps the central opening. We securely fix the metal “patch” using universal glue and self-tapping screws (for this you first need to drill holes around the perimeter of the steel sheet at an equal distance from each other).

After that, we turn the countertop over and put the old tool inside the rectangular “window”, you can even slightly “corroded” with rust - for greater realism. As a "filler" for the countertop, use drills, files, circular saws, axes, hammers and other tools that are at hand.

Then it remains only to fill the central part with an epoxy resin diluted with a hardener (it is best to use the components of a mixture of one manufacturer). After the epoxy is dried, the countertop itself needs to be well sanded, painted and varnished. Since the table is quite heavy, it is advisable to fix the legs with screws to the floor.
To summarize
Due to its large size and heavy weight, it will not work in a city apartment. However, such an original countertop will become a worthy decoration of a country house or, for example, it can be placed on a summer cottage. See the detailed manufacturing process in the video on our website.