To make the use of a hand milling machine as convenient and practical as possible, you can make a table for it, which can be fixed on a workbench in the garage and workshop or in a vice mounted on a vertical rack.

As the main material for the manufacture of this device, you can use plywood 2 cm thick, which must be cut into individual parts and blanks.
The main stages of work
From the plywood sheet, cut out the base for the milling table. In its central part, we make a recess under the "sole" of the hand mill and a through hole under the mill. It is also necessary to drill four holes for the screws to secure the tool.

After that, from a rectangular piece of plywood, you need to make a clamping bar with an opening on the side for removing chips and dust. On both sides of the platform (on the underside of the table), two square stops must be attached to the screws, which can be cut from plywood of suitable sizes.
Assembly and refinement
We fasten the hand router to the platform and install the entire structure on a workbench. Using two clamps, we fasten the clamping bar to the table. In the hole for removing chips and dust, insert the hose from the vacuum cleaner or connect the sleeve from the hood, if it is installed in the workshop.

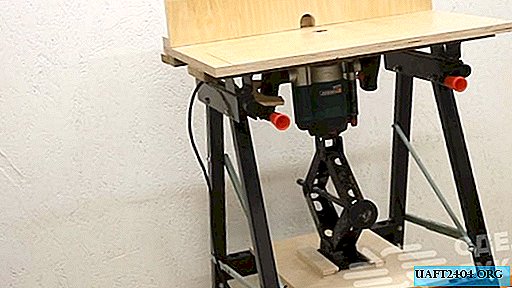
To quickly adjust the cutter reach, you can use the jack, which is installed under the milling cutter. In order not to twist it manually, you can use a conventional power drill or screwdriver. See the video on our website for details.