Share
Pin
Tweet
Send
Share
Send
In modern times, we are having more and more electronic devices. Smartphones, tablets, smart watches, MP-3 players. Charging them at the same time sometimes becomes a task. You can, of course, take an extension cord, to a certain number of outlets, and organize such a charging corner. I usually do not use a smartphone when charging.
I decided to make such a charging station for a charge. It occupies one outlet and it is not difficult to make it.
Will need
The basis is an old power supply from a computer. I got a board without a case. There is no source on duty on the board and there are no 3.3 volt elements. It feels like there wasn’t. Everything looks neat.

In the bins, I took the case from the computer's power supply. You can apply any suitable one. But the board is the place in this case.

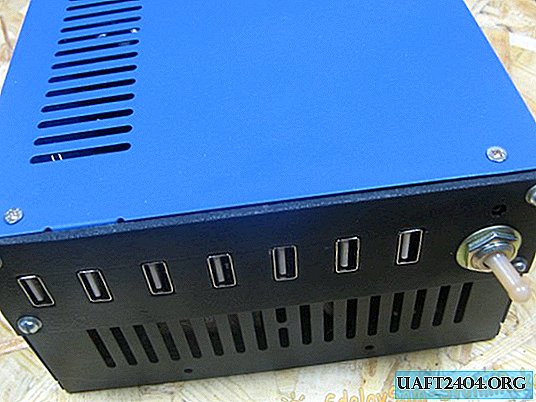
USB ports were ordered from China. I decided to install 7 pieces. I did not want to put too closely. You can of course arrange it differently, then more will fit. I am satisfied with this amount.

The network switch for me is the T3 toggle switch. You can apply any. I have a toggle switch breaking both network wires.

The indicator is a domestic LED. I connect through a current-limiting resistor 1 kOhm to a 12-volt line.

I will install USB on PVC plastic. I really like this plastic, it is very simple to work with it.

We make a charging station for USB gadgets
I mark holes for nests. Also under the power switch and LED. I mark on a protective film.

I cut out all the windows and drill holes. I remove the protective film.

I duplicate the holes on the panel of the power supply housing. I paint a socket on their PVC. Also, I paint and the lower part of the PSU case.

The lid of the body is also painted. All paint matte paint, this was in stock.

I solder the native wires of the PSU. Instead of soldered wires I solder a couple of others. Green minus, red plus. The twisted wire will go to the LED.

I fasten the socket. I set the switch. I also install the network connectors in place (removed them when painting).

I install the sockets in the windows and fix them with glue. The LED is also fixed with glue.

I connect the positive contacts to each other, the negative contacts too. The resistor was soldered to the LED, the resistor was hidden in a heat shrink tube. Soldered the power to the LED.

The plus and minus wires, from the board, were soldered to the jumpers of the USB sockets. From the old project, there was a piece of plastic, they fixed USB. Nests sit tight. The main thing is not to overdo it with hot glue, you can fill the springs in the nests. I had to soften the glue a little, the connectors did not enter the socket.

Unplugged the switch. I fixed the wires with electrical tape, so it’s more beautiful.

I put the lid on and screw it on. Such a neat charging station turned out. At the same time connected to her smartphone, MP-3 player, Powerbank. How did the unit test under a load of 5 amperes, everything works fine.
Share
Pin
Tweet
Send
Share
Send