Share
Pin
Tweet
Send
Share
Send
The idea to make a small fountain came to my mind for quite some time. Moreover, it is small, since there is not much space on the table, plus an autonomous one. Once I even made a fountain. But the pump was purchased (for an aquarium) weighed about 400 grams and pumped be healthy. Accordingly, the fountain turned out not so small as I wanted. And here the other day one more time rummaging in its spare parts from electronics I came across a bunch of micromotors from cameras. And the thought came that you can make a pump yourself, and so small that the fountain will be the size of a pack of cigarettes in size.
He decided to make the pump on the principle of a centrifugal pump. Water enters the reservoir through the inlet, and there it spins with a wheel with blades. Due to centrifugal force, water tends to the edge on which there is an outlet.
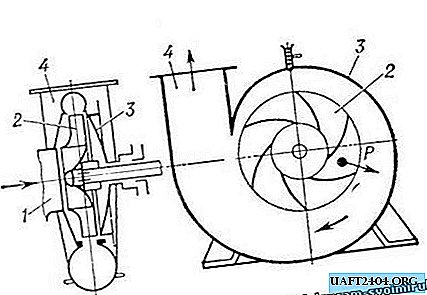
1 - hole for supplying fluid; 2 - impeller; 3 - case; 4 - pipe for fluid drainage; P - centrifugal force
So let's get started. That's actually the motor itself, the size is more than acceptable. ?

Under this motor we make an impeller that will pump water.
I made it from the first plastic gear that came across.

After processing under the size of the pump casing, it began to look like this.

Now we make blades from pieces of plastic and glue them to the impeller. After the glue dries, we process the ends with a file so that they do not go beyond the wheel.

We begin to manufacture the body of our pump. As him, I took a plastic cap from the deodorant.

We saw off the excess from it and drill two holes. Small at the top for the axis of the motor, and large for the exit of water.

Now we attach the motor and the outlet tube to our body with hot glue. As her case was chosen from a ballpoint pen.

The motor should be glued very carefully without distortions so that the impeller does not touch the inside of the housing during operation.

As soon as the glue dries, we cut out a panel with a hole for water inlet from a piece of plastic. I made it out of a sunflower oil cap.

We glue it tightly to the body and our mini pump is ready. Such a pump with its dimensions in test tests gave a column of water 20 cm high and 4 mm thick (inner diameter of the handle body) when powered by a 3.7 volt Nokiev battery. If the outlet is already made, then the flow will be higher, but I did not need it.

Now we begin to manufacture the fountain itself. Here, as they say, who, what fantasy is enough. In my imagination, it was a slide, from which a stream of water falls from above, changing direction when falling. I decided to make it out of foil, stupidly crumpling several balls and gluing them with hot glue. After gluing and preliminary painting, the workpiece looked like this.

As a source of water flowing from, I took a shell of a suitable size and drilled a hole for a tube in it.

After attaching the pump and decorative elements to the slide, I got this. The unpainted foil cubes were temporary for adjusting the flow direction while attaching shells and the lower groove.

As a water tank, I took a small plastic box.

After gluing with foil balls, it began to look like this.

Now we insert our slide into the tank, glue the battery, switch, charging connector and optional trimming resistor to adjust the flow strength and LEDs for illumination. Then we glue the slide itself to the tank along the edges with hot glue.

We mask the junction of the slide and the reservoir with foil balls and paint it completely, not forgetting to protect unpainted elements.
After the paint dries, fill the tank with water, turn on the power and enjoy the work done: D


That's all I wanted to say. Thanks for your attention!
PS: For those who do not understand something:


Share
Pin
Tweet
Send
Share
Send