Share
Pin
Tweet
Send
Share
Send

So, the first thing to do is assemble all the necessary components. They include: 1 pencil, two old dried pastes, a piece of PVC pipe, one dead light bulb, a long piece of gum, a paper clip, aluminum foil, scotch tape, one small motor from the toy, a nine-volt battery, and some wire, well, the base is wooden plank. Everything is visible in the photo:

The first step in your actions will be to drill a hole for the tube at the base of the base. It is necessary to take a drill with a feather drill of the required diameter so that the PVC tube fits tightly.

Next, you make two through holes through both sides of the tube. The distance between the holes is such that when inserting the paste and the interference between the gum pastes, so that the gum is slightly stretched. Make sure that the elastic does not sit too tight otherwise it will stop the engine.

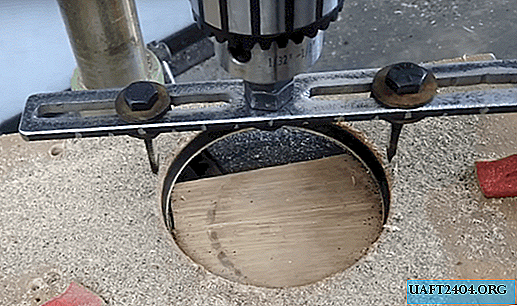
Then we make two more holes in the tube. The first hole should be drilled just above the first on the same axis. The second hole should be directly perpendicular to the bottom. Look carefully at the photo:

Now you need to remove the ink from the paste. I used a ribbon tie, like the ones that come with garbage bags, to clean the paste. What use do you think yourself.

Next, you cut a piece of paste along the length of the inner diameter of the PVC pipes. Then take a paper clip and cut a piece of sufficient length so that the piece protrudes from the tube at least a centimeter. See photo:

As you might have guessed, we’ll need two of these rollers. Before assembly, a dielectric film must be assembled. It is made from scotch tape and our gum. The elastic is glued with tape so that the adhesive sides are glued together. You don’t even need to glue a strip of scotch tape, but simply put on an elastic band from the top to press on our rollers.
Then take a pencil eraser and assemble our design as shown in the figure below. For reliable connection with super glue, the motor shaft is glued to the eraser and paper clip.

The next step is to add brushes that collect charge. The lower brush, as shown in the picture on the left, passes through the hole in the lower part, the end of the wire should be smudged. You must make sure that the brushes are close to the elastic, but should not touch it. The upper brush, as shown in the figure on the right, passes through the upper hole.

The next stage and the final - we glue the burnt bulb with a piece of aluminum foil. A key role in providing aluminum wire is more charge in order to collect it as much as possible. Then we connect the top wire to this foil on the lamp and insert our electrode lamp onto the top of the entire structure. Well, that’s what you now know how to build the Van de Graf generator yourself.

That's all! Well, now you can play with static electricity
For reference:

The principle of operation of the Van de Graaff generator is very similar to the principle of the Wimshurst machine, but instead of rotating disks, it uses a moving belt on two pulleys. The belt is electrified from friction against the lower pulley (in large machines it is additionally supplied with voltage from a high-voltage source, in small ones there is enough friction), and at the upper end of the belt the charge is removed and accumulates on the surface of the ball. Large Van de Graaff generators are capable of developing voltages of millions of volts and are several meters high.

Share
Pin
Tweet
Send
Share
Send