Share
Pin
Tweet
Send
Share
Send
The assortment of filament curtains and curtains is very diverse: they can be made of beads and beads, buttons, sequins, braid, small figures made of polymer clay, and modern products can even be decorated with particles from CDs.

First, I will tell you about making curtains or curtains for a window or door. To make it, we will need:
- Small multi-colored beads;
- Compact discs (CD or DVD);
- Scissors for metal;
- Reliable glue and adhesive tape;
- Durable thick or medium thick copper wire;
- A lath (eaves) or strong braid as the basis;
- Threads of white color.
Getting to work, we first take the thing that could be suitable as a basis. This thing should be slightly longer than the window frame. First, we decided to take a rail, consisting of two parts, folding together:

Next, we take a thick wire and unwind a part from it that is equal in length to the length of the rail. We introduce this part of the wire inside one of its parts:

After that, we need to tie threads up to 70 - 80 cm long to the wire. About 40 pairs (77 pieces), and then connect the rail to its second part, which should hide the wire inside and tightly compress the threads:

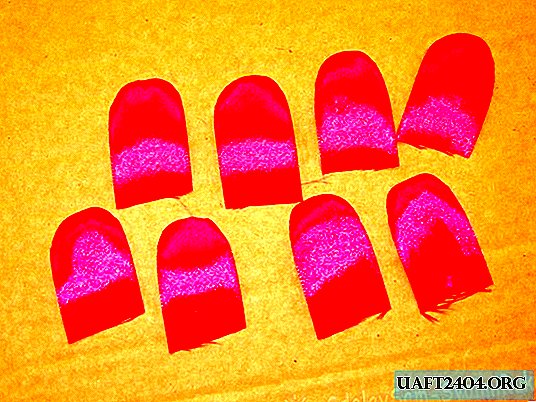
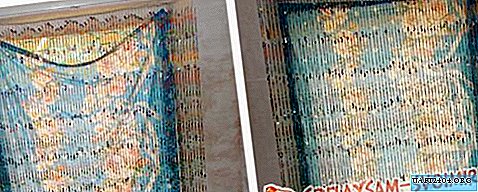
Then we glue the cut particles from the CDs in a zigzag line to the threads and apply small beads.
You need to cut the CDs using nippers or special scissors for metal, because ordinary scissors can break; stick the particles with a reliable glue or tape. When cutting, many disks scatter into their constituent parts and particles fly apart, with which you need to be careful. These particles will then need to be glued together:

We decided to make such patterns:


To make this decoration we needed about 3 months of time. We got such a curtain:

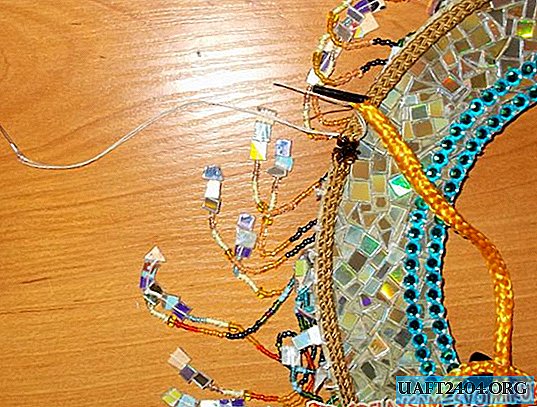
After completing the work, we decided to make the second version of the curtain from beads, on the basis of a strong braid. First we picked up a strong braid:

In order for the distance between all the threads to be the same, you need to calculate it by measuring the length of the braid and dividing it by the number of threads:

Next, with the help of a needle, we sew all the bead jewelry on the threads to the braid on its reverse side (not from the bottom, otherwise the nodes will be visible):

After all the threads have been sewn, it will be possible to attach small loops from both ends of the braid in order to hang the finished curtain by nails by the window or in front of the door. If there are no nails, then you can pin it to the wall with large stationery buttons:

Now we set about making a chandelier (lampshade).
First we take a piece of dense plywood, on which we need to draw a circle shape, and then cut it. To draw an even pattern, you need to use any round object, for example, a lid:

The base for a chandelier made of wooden plywood can be taken for work if a non-overheating (energy-saving) light bulb burns inside the future chandelier.
Next, inside the shape, draw a second circle and cut it out:

Now we take the CDs:

Particles cut out of them need to be glued on both sides (top and bottom) of the plywood base, leaving small free areas at the edges so that it can be braid with beads on threads:

On top of the particles, the craftsmanship can be pasted over with rhinestones, if desired, and the narrow non-pasted areas on the sides can be painted with varnish.

Next, we glue the base on the second side, also leaving small free areas along the edges:

Now we are finishing decorating crafts with rhinestones and getting ready to sew the braid.

Sewing braid to the plywood base is not difficult, the needle passes through it without much difficulty.
Too long strands with beads need to be shortened 4 times (cut), since the beads strung on it can be too heavy and bend down the base. We decided to sew the braid on the other side, which is pasted over with rhinestones. The finished chandelier can slightly overlap the lighting of the lamp, and therefore it is undesirable to use beads with darkened tones in its manufacture:

At the end of sewing, the excess fabric of the braid must be cut and burned with a match or a lighter so that the threads of the braid do not crumble:

Then on the other (back) side we need to hide the seams by pasting them on the outside with particles from the CDs. Gluing them a little harder because of the knots on the threads.
This is what this side looks like now:

So she began to look after treatment. Some particles still bounce:

Next, we need to take two long (about 30 cm.) Ribbons or laces and connect them in the middle. These shoelaces will have to hold the chandelier on the lamp wire.

We need to bend two long shoelaces in half and sew a round lock and a ring to their midpoints (sew a lock on one side and a ring on the other), but if there is no such lock, you can take a plastic clip. This is necessary so that the finished chandelier rests securely on the lamp wire. We used a plastic clip without finding a round lock with a ring:

Next, we sew the laces to the braid of the chandelier.
Black lugs from the shoelaces cannot be removed; They will be able to slightly hide the scorched sections of the tape:

So the finished craft will look like:

So she looks suspended from a light bulb:


After that, everything - our handmade chandelier is ready.

Share
Pin
Tweet
Send
Share
Send