Share
Pin
Tweet
Send
Share
Send
In this master class, you can knit a jacket for a height of 62-68 cm.
Materials: children's acrylic YarnArt Baby (300 m in 200 g), knitting needles No. 3 ordinary and hosiery, 4-5 buttons, a pair of additional knitting needles.

Types of knitting:
1. The gum. Face knitting: alternate 1 person., 1 out. a loop. Wrong knitting: on the contrary - to alternate 1 out., 1 person. loop
2. The main pattern. Front side: front loops. Wrong side: alternation to the end of a row (1 persons., 1 out., 1 persons., Etc.).
3. Edge loops. Always front loops.
4. Button hole.
Closes 1 or 2 loops (depending on the size of the button). In the next row, in place of the hole, the removed number of loops is typed.
Jacket
Back
Type 65 stitches on the knitting needles. Knit with a 4 cm elastic, not forgetting the edge loops at the beginning and end of the row (I got 11 rows).

Next, we knit between the hem of the main pattern 21.5 cm.

We close the loops and it turns out the back of the future jacket (you can not close it and leave it on the spoke if you will sew the product the way I do). The front and the wrong side in the photo. I liked the drawing on the wrong side.


Left shelf
On this shelf there will be holes for buttons. We collect 36 loops.

We knit 4 cm elastic (11 rows) between the edge loops. Next, we knit 1 edge loop, 29 loops with the main pattern, 5 loops with an elastic (this is the bar) and again 1 edge loop. After 2 cm of knitting, in the middle of the plank we make a hole for the button. The following holes are made with an interval of 3-4 cm. I made only 4 holes on the whole jacket and closed 2 loops because of a rather large button, you can create a hole on the neck.


We knit 18 cm and leave from the right edge 12 loops on an additional spoke for the neck.

In each front row after that, first we close 3 loops, then two times 2 loops, and the last time 1 loop. It turns a rounded neck.


We are tied up to a height of the back of 21.5 cm. Now we close the hinges evenly if you collect the jacket with a needle.

I left it on an additional knitting needle, since I connect the parts with knitting needles (more on this method is described below).
Right shelf
Knits just like the left, only symmetrically. In this case, you do not need to make holes for the buttons and the strap fits on the opposite side. Neck loops are also left on the other side. As a result, we get 3 details.

Sleeves
For one sleeve, we dial 39 loops on the needles.

Between the edge loops, knit 5.5 cm (18 rows) with an elastic band.

We knit further the main pattern. For beveling the sleeves, make additions at the end and beginning of each 8 row. Such increases are knitted 5 times.


The added loop is shown in red in the photo. After 12.5 cm from the elastic, close all the loops or leave on the spoke.


This turned out to be a sleeve in expanded and folded form.
Jacket assembly.
1. Sew the straps to the back in the shoulders. You can use a thread and a needle for this, but it seems to me that more accurate seams are obtained if you connect them with knitting needles. How to do it? To begin with, two stitched parts must be on the knitting needles and have an equal number of loops. Next, take the knitting needles with one hand parallel to each other and knit the front, removing two loops (with one and the other knitting needles together). Knit the next loop, closing.

The seam is almost invisible from the front side, and from the inside it turns out a neat pigtail.

2. Now you can proceed to the neck. We need the left 12 loops on one side and the other. For each of these knitting needles we lift 8 loops from the bevel of the neck, we get 20 loops on both sides. On the back there were loops in the middle.

3. Next, we knit the required neck length (3-4 cm) or more, depending on our desire. From a longer neck you get an interesting collar. You can also make another hole for a button or two. I decided to leave it like that.

4. Sew the sleeves so that the middle coincides with the shoulder seam. I knitted the sleeves as well as in the previous case. At the junction of the sleeve with the jacket, you need to crochet the same number of loops as in the sleeve. Link them together.

Next, we sew the sleeve along the fold.

It turns out a neatly sewn sleeve, we twist it, hide the extra thread.


We are doing the same procedure with a different sleeve.
5. Now we sew the jacket on the sides, just as carefully.
Beanie
At first I knitted a hat of milky color, the same as a jacket. But then she changed her mind, so as a result she turned blue. For knitting we need 5 stocking knitting needles. We collect 80 loops, distribute them over 4 knitting needles.

We knit in a circle with an elastic band about 5 cm (15 rows).

Then we continue with the familiar basic pattern. Knit 10.5 cm.

Now you need to do the reduction. On each spoke in the corners we remove 2 loops, and 1 we knit, as the front one and stretch through 2 removed. You get 4 decreases, you can make 6, just by distributing them evenly over the knitting. The photo shows 3 loops that have turned into one.

In each front row, we repeat the decrease in the same places 6 more times.

It turns out already something similar to a hat. We knit another row in this way: 2 loops together, like front ones. Stitch the remaining loops with thread and sew on the pompom. It can be made large or small, the same color or contrast, or multicolor. To your taste.

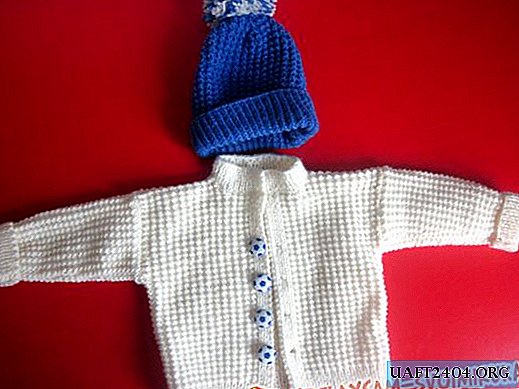
The result was such a nice kit for a nephew.
Share
Pin
Tweet
Send
Share
Send