Share
Pin
Tweet
Send
Share
Send
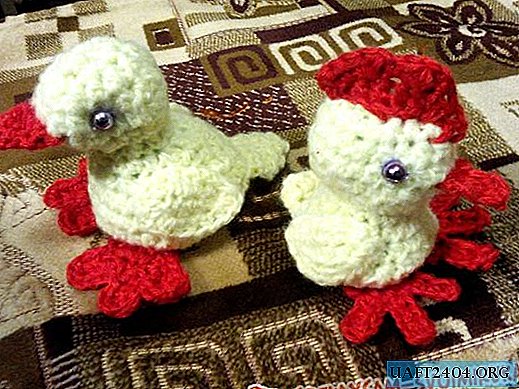
Children, especially preschool children, love to play with small toys. They can be carried in a backpack, housed in houses, laid under a pillow or pocket. Such a small toy can be knitted independently. Lovely bird community for the poultry yard - crocheted chicken and duckling.

The method of crocheting chicken and duckling is similar, there are only slight differences, so the description of the models are similar.
For knitting, a rather thick acrylic yarn of yellow and red color and an N4 hook are used to provide the most dense knitting. The main method of knitting is crochet.
Chick.


Knitting with yellow yarn begins with a circle: 3 vp, close in a ring, then in a ring 6 st.b. nakida, then in each loop of the lower row we knit 2 tbsp. In the 3rd, 4th, 5th row, we add 1 tbsp. With a crochet in each second loop of the lower row. Then we stop adding loops and knit the 6th, 7th, 8th, 9th row, getting a cylindrical shape.
Then we reduce the loop through one in 10, 11 rows, getting the neck of the chicken. Then we repeat the addition of loops to every second loop of the lower row in the 12th, 13th and 14th row. We fill the figure with a light and volumetric filler, for example, synthetic winterizer. Then close the loops, knitting two loops of the lower row together. We supplement the toy with a portion of the filler. The last 4 loops are closed with one loop, forming the crown.


For the tail, we collect 4 loops in the lower part of the form, which we knit in 3 rows with double crochets. Then we connect the last loop of 3 rows with the first, forming a corner.
Duckling.

We start knitting not with a circle, but with an oval. To do this, we gain 5 vp and knit in a circle, as described for the chicken model. In the 10th row, we begin to reduce the loops: we knit half of the row, then we turn the knitting, we reverse the direction of the double crochet, reducing one loop in the center. Again we turn the knitting, we knit the same half of the row, reducing 2 loops in the center. Next, we continue knitting in a circle 2 rows of st. With a crochet, forming the neck of a duck. Then evenly add 4 loops in the 13th row, 4 loops in the 14th row. Then we reduce the loops, as described in the previous model. We perform the tail in the same way, but we make it a little more - 5 loops.
Wings The wings are tied with individual dctals: with a yellow yarn we dial a chain of 5 vp and we knit them in a circle in 3 rows, the loops are added when turning knit 3 VP to the extreme loop of the row. It should get 4 wings.


Beaks. Change the yarn to red and knit the beaks. To do this, we collect 4 vp for chicken or 5 vp for duckling directly on the form of a toy. For the chicken, from the second row we reduce the loops, getting a thinner beak. For the duckling, we knit 3 rows without reducing the loop, in the 4th row we reduce 2 loops and close the row.

For chicken, also tying a small scallop. We pick up red VP yarn at the crown of the toy model. We knit the back row according to the scheme: * 2 st. With a crochet in each loop, 3 st. With a crochet in one loop of the bottom row *.


Paws. For chicken: 3 vp, 6 vp. Without crochet in a circle, 5 vp. For finger, in the opposite direction 4 vp. Further in a circle 5 tbsp.
For the duckling: we carry out everything that is described above, then we knit the entire part along the contour of the st. With a yarn in each loop.

Putting the toys together. Sew the wings with yellow yarn. For paws we use red yarn. Next, we use small beads that we sew or glue like eyes.

Here is such a friendly bird couple turned out.

Share
Pin
Tweet
Send
Share
Send