Share
Pin
Tweet
Send
Share
Send
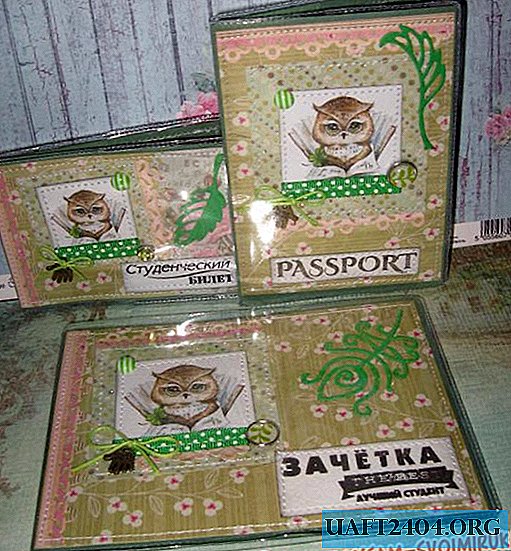
To do this, take:
• Dark green pastel paper, take a large sheet of A3 format;
• Three transparent covers;
• Three pictures with owls;
• Pastel paper in green tones of several colors;
• Rep ribbon dark green in white polka dots;
• Epoxy brads of a green shade;
• Waxed salad-colored cord;
• Acrylic stamps "Set-off" and "Passport";
• Three white and salad striped cabochons;
• Ink and block acrylic;
• The printed inscription "student card";
• Metal pendants, bronze handles, all 3 pcs;
• Cut green branches of various shapes, also 3 pcs;
• Pearl half beads;
• Double-sided tape, PVA glue, double-sided tape;
• Curb hole punch;
• Pencil, ruler with scissors.

First, we cut out the basics of the covers themselves. To do this, put a pastel sheet of paper and cut out three rectangles.


The dimensions of the bases in expanded form in the following sizes: 7.5 * 20.7 cm, 11.2 * 30.5 cm and 12.7 * 18.2 cm. Now we divide all three in half.


Now we will decorate the covers on top.

Immediately prepare the inscription. To do this, take an acrylic block, attach a stamp to it, dip it into an ink pad and stamp it on white cardboard. Two inscriptions are stamped, and one printed, all three inscriptions on the edges are a little tinted, we create the effect of antiquity, so to speak.


Scrapbooking paper we have several similar colors, so our rectangles will consist of two parts. We should get scrapbook rectangles of such sizes.


Three squares are cut out of a sheet of scrapbook paper with glitter, on them we glue tape on the picture for each, and from the rep ribbon we cut out a strip of rep ribbon to the width of each picture.


Glue the tapes with glue at the bottom of each picture. We make lace strips with a puncher.


Glue PVA glue strips on the rectangles. We glue inscriptions, squares with pictures and all these details each separately sew on a machine. We make cuts with a clerical knife, insert the brads.


Now the back and front parts of the three covers are glued to the basics.


Sew each side of each cover on a typewriter. We knit bows from the cord, glue the decorations about the same on all covers. It remains only to insert them into transparent covers and you're done.


The result is such an interesting and stylish student set. I wish everyone good luck and create with pleasure.


Share
Pin
Tweet
Send
Share
Send