Share
Pin
Tweet
Send
Share
Send
Slippers can be sewn on the machine, processing the details with an overlock.

I offer step-by-step instructions for those who know how to work with a hook.
We will need
Pieces of old thick leather (you can use leather from old boots), pieces of thick warm material (such as overcoat weaving, wool, or something like that), synthetic threads, scissors, a hook, as well as an object that you can make holes (you can use hole punch, but with it you get big holes. For these purposes, I asked my husband on the machine to make a special hole punch from the pliers, it’s very convenient!)

Manufacturing process
1. We begin with drawing patterns.

We do the pattern ourselves, over time you will not have much difficulty for making slippers of any size. Try starting with small, children's slippers. Reshoot the sole from ordinary slippers by lengthening the nose as shown in the photo.
2. According to the pattern, we cut out the details.

First, the sole of the slippers: these are 2 parts on the inside (wool) and 2 parts on the outside of the slippers (pieces of thick leather work well. You can take dermantine for this purpose).
For convenience in work, sketch together part 1 and part 2 (inner and outer part of slippers).

3. We make the upper part of slippers. We will need the same material (wool and leather (it can be a little softer than for the sole of the product). At the output there are 8 parts for two slippers. We also sweep them in two parts (the outer part and the inner one).

4.With a hole punch, we make holes in the prepared parts. The distance between the holes and from the edge of the part is not more than 1 cm.
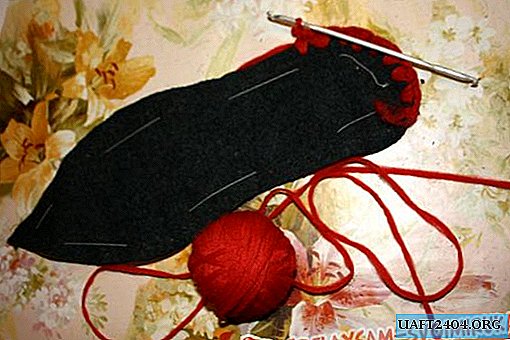
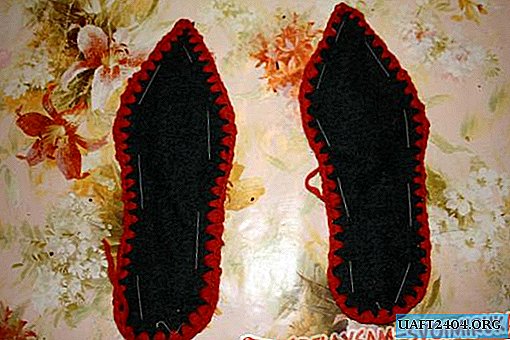
5. Without haste, we crochet the sole, and then the upper parts.
6. Between us we hook 2 upper parts.

7.Connect the upper and lower parts. First, pin together with needles so that the parts lie exactly to each other, and then we crochet.

8. One slipper, and then another!

9. One of the important decorative elements of our product is pompoms. To make a pompom, you need to cut 2 identical circles. In each circle draw another circle, with a diameter smaller. Cut inner circles. Connect the resulting parts together, wrap with thread.

Cut the threads in diameter between the two patterns. Tighten the cut threads with a strong rope. Fluff the resulting pompon.
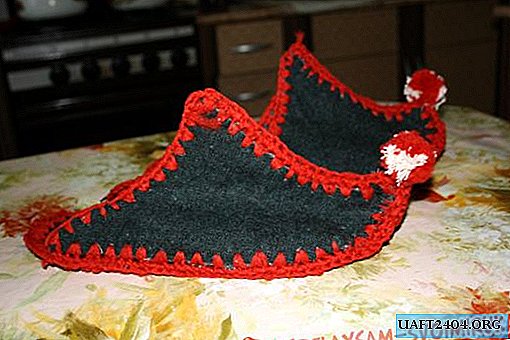
10. Sew pompons to the “nose” of slippers. The product is ready!

R.S. For the design of finished products, you can use embroidery or applique. For each pair of slippers, come up with your own theme for decoration (circles, patterns, rings, etc.). Each of you can decorate the finished model, showing creative imagination! With such a “slipper” surprise, you will not only surprise your guests, but also make it clear that they are waiting for them. Good luck
Share
Pin
Tweet
Send
Share
Send