Share
Pin
Tweet
Send
Share
Send
This article provides a detailed description of the manufacturing process of Roman curtains.
The size of the curtains in the finished form: height 1.52 m, width 1.15 m.
To make a Roman curtain, you will need the following materials and tools:
1. two types of fabric (top fabric - organza, lining fabric - veil),
2. sewing threads in fabric color, 4 spools,
3. fiberglass inserts, 4 pcs., 1.15 m long,
4. weighting compound, 1 pc., Length 1, 14 m,
5. sewing machine,
6. overlock,
7. iron
8. Velcro (Velcro) is soft, 1.15 m long,
9. cornice for a Roman curtain, to a height of 1, 52 m, and a width of 1.15 m.
10. plastic transparent rings, 12 pcs.,
11. plastic transparent ends, 3 pcs.
12. safety pins,
13. chalk tailor,
14. bugles on a satin ribbon, 2.20 m.
Before cutting, it is necessary to iron both fabrics very well so that they immediately give maximum shrinkage. Otherwise, if the fabrics "sit down" in the finished curtain, this will adversely affect its appearance and linear dimensions.
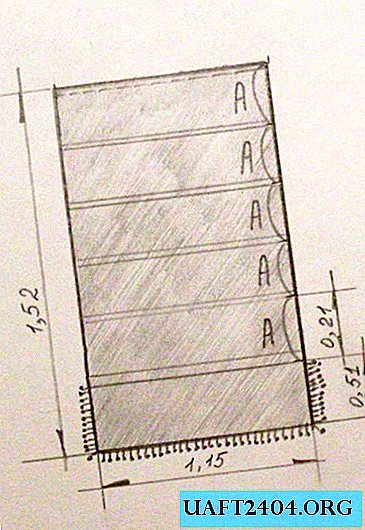
The diagram shows the Roman curtain in the finished form.
In the cut, the curtain should be this size: height - 1.60 m, width - 1.17 m.

Align one longitudinal and one transverse section of both fabrics (in height and width of the future curtain).
It is more convenient to do this by spreading the fabric on the floor (preferably on the carpet, so as not to slip).
Chip both fabrics together with these pins along these sections, folding them with their sides inward.

Sew chipped sections on the overlock. Do not forget to remove the pins as you work so that they do not fall under the overlock knife.
Pin the processed sections into a stretch on an ironing table, iron and leave to cool completely.

Spread the curtain on the floor. Set the curtain width (1.17 m) in the opposite direction from the cut. In the finished form, the width of the curtain is 1.15 m, but to this size we add 1.5 cm to the seams and 0.5 cm to work.
Mark the line of the second side of the curtain with chalk. Chip off layers of fabric, cut along the intended line.
Remove the pins. Trim the sections of the second side of the curtain separately from each other.
Pull off treated sections with an iron similar to the first seams.
If the seams are not pulled back (i.e., fix the desired length with an iron), then in the future the seams will tighten strongly, which will spoil the appearance of the curtain.
Pay attention to the layout of the curtains in the finished form. It handles one wide drawstring (under weighting), and 4 narrow drawstring (under fiberglass inserts). Before marking these wings, cut off the sections of the curtain, swept separately, among themselves.
Then mark the wings in accordance with the diagram. The width of the drawstring under the weighting is 3.5 cm, the narrow drawstring is 1 cm.
The distance between the wings (on the diagram - "A") is the same, 21 cm.


Sew the second side seam of the curtain, leaving the curtains un sewn.
Remove the pins. Turn the curtain to the front side. Iron all seams.
Fold the curtain on the table, if possible - pin along the side and bottom seams.
Measure and set aside the length of the curtain in the finished form. Put pins on these marks.


Mark the drawstring along the front side of the curtain, and sweep both layers of fabric with hand stitches at a distance of 5 mm from the drawstring. This will help to avoid shifting the layers relative to each other in the process of laying stitches. Sew stitches in the backstage. Delete the note. Pull all drawstring like seams.

Iron the top cut of the curtain over the pins towards the wrong side. Cut the allowance to 4 cm. Then iron this allowance in half, pin it in several places with pins, in order to avoid displacement of the fabric layers relative to each other due to the thickness.

Stitch soft Velcro over the top of the curtain. Remove the pins.

Stitch the bugles on the tape with a zigzag seam along the bottom edge of the curtain (see marking in photo 1).

From organza, cut 2 loops to pick up the bottom of the curtain. The size of the loop in a cut is 40 * 18 cm.
Fold the loop in half, grind along the sections with a seam 1 cm wide, leaving a small opening in the longitudinal seam for turning out. Turn the loop to the front side, iron it.
Mark the location of the loops on the curtain. They will be located at a distance of 36 cm from the side seams.

Stitch the loop on the wrong side of the curtain.

Stitch the loop on the front of the curtain, picking up in 2 small folds.
Sew the end caps and rings on the wrong side of the Roman curtain. The ends are sewn onto the drawstring under the weighting compound, the rings are sewn onto the drawstring under the fiberglass inserts. The extreme rings and limit switches are sewn at a distance of 8 cm from the side seam, and the central ones are in the middle between them.
Iron the finished curtain if necessary. Assemble a curtain rod for a Roman curtain. Hang it on the ledge, and attach the ledge to the ceiling or wall above the window.

The Roman curtain is ready!
Share
Pin
Tweet
Send
Share
Send